Van Floor: What I'd Do Differently
Practical lessons for a nicer finish in less time with careful product choices.
Key Lessons
- • Skip spray foam in corrugations - use rigid foam board instead.
- • Plan wire routing before gluing anything.
- • Don't skip the 1/2″ plywood subfloor.
TL;DR: Don’t fill corrugations with canned spray foam. Dry-fit 1″ rigid foam board directly on the peaks, plan 2–3″ wire channels before gluing anything, don’t skip the 1/2″ plywood subfloor, and install finish flooring BEFORE cabinets/electrical—order of operations matters. Budget double the time you think, allow for workspace overhead, and don’t have a trip planned. If budget allows, a pre-cut finish-floor kit saves 4–6 hours and eliminates order-of-operations mistakes.
When I started my van build, I thought the floor would be straightforward. Cut some foam board, lay it down, add plywood, done. This guide can be applied to different van models such as Ford Transit, other Sprinter lengths, and Dodge Ram Promaster. After 8 hours of initial floor install work (with 2 people), covered in spray foam and regret, I learned that van floors are where most builds either start strong or stumble into expensive mistakes. It took another 6 hours with 2 people for the finish flooring, bringing the total to 14 hours.
But the bigger lesson came later: I installed the plywood subfloor, painted it, and moved on to cabinets and electrical. When I wanted to add finish flooring, I couldn’t—everything was interconnected. That’s when I learned that order of operations matters more than anything, and that I’d underestimated both the time and workspace requirements.
This is the story of how I made it harder than it needed to be—and what I’d do differently if I started over tomorrow.
I also used spray foam for gluing the insulation to the floor—not recommended. This only works if you get the thickness perfectly right. Construction adhesive is more forgiving to bond XPS foam board (rigid extruded polystyrene insulation) to the floor.
The essential anatomy of a van floor
Van floors are corrugated—ridges add chassis strength, but they complicate insulation and mounting. A good floor has four layers:
- Corrugation filling — Levels the metal floor corrugations (optional; rigid foam board can sit on peaks)
- Insulation + furring strips — Insulation with furring strips (wood strips used to level and support the floor structure) at the same level that prevents the insulation from being crushed and supports the plywood above. Rigid XPS foam (1″–1.5″) is more structurally sound than wool batts (approximately 2″), so can be thinner.
- Plywood sheet — Structural subfloor (typically 1/2″–3/4″ plywood) that distributes loads
- Finish flooring — Durable, sealed walk surface (vinyl/woven, etc.)

Cut-away rendering showing furring strips on corrugated floor with insulation filling the voids, covered by plywood subfloor. This image shows 2" wool batts—if using rigid XPS foam (more rigid than wool), you can use thinner insulation at 1"–1.5" thickness. Image from MauiTheVan.com's Havelock Wool Ultimate Van Floor Guide.
Each layer bonds to the one below. Get the order or materials wrong and you’ll chase cold spots, soft areas, squeaks—or pull it all up later.
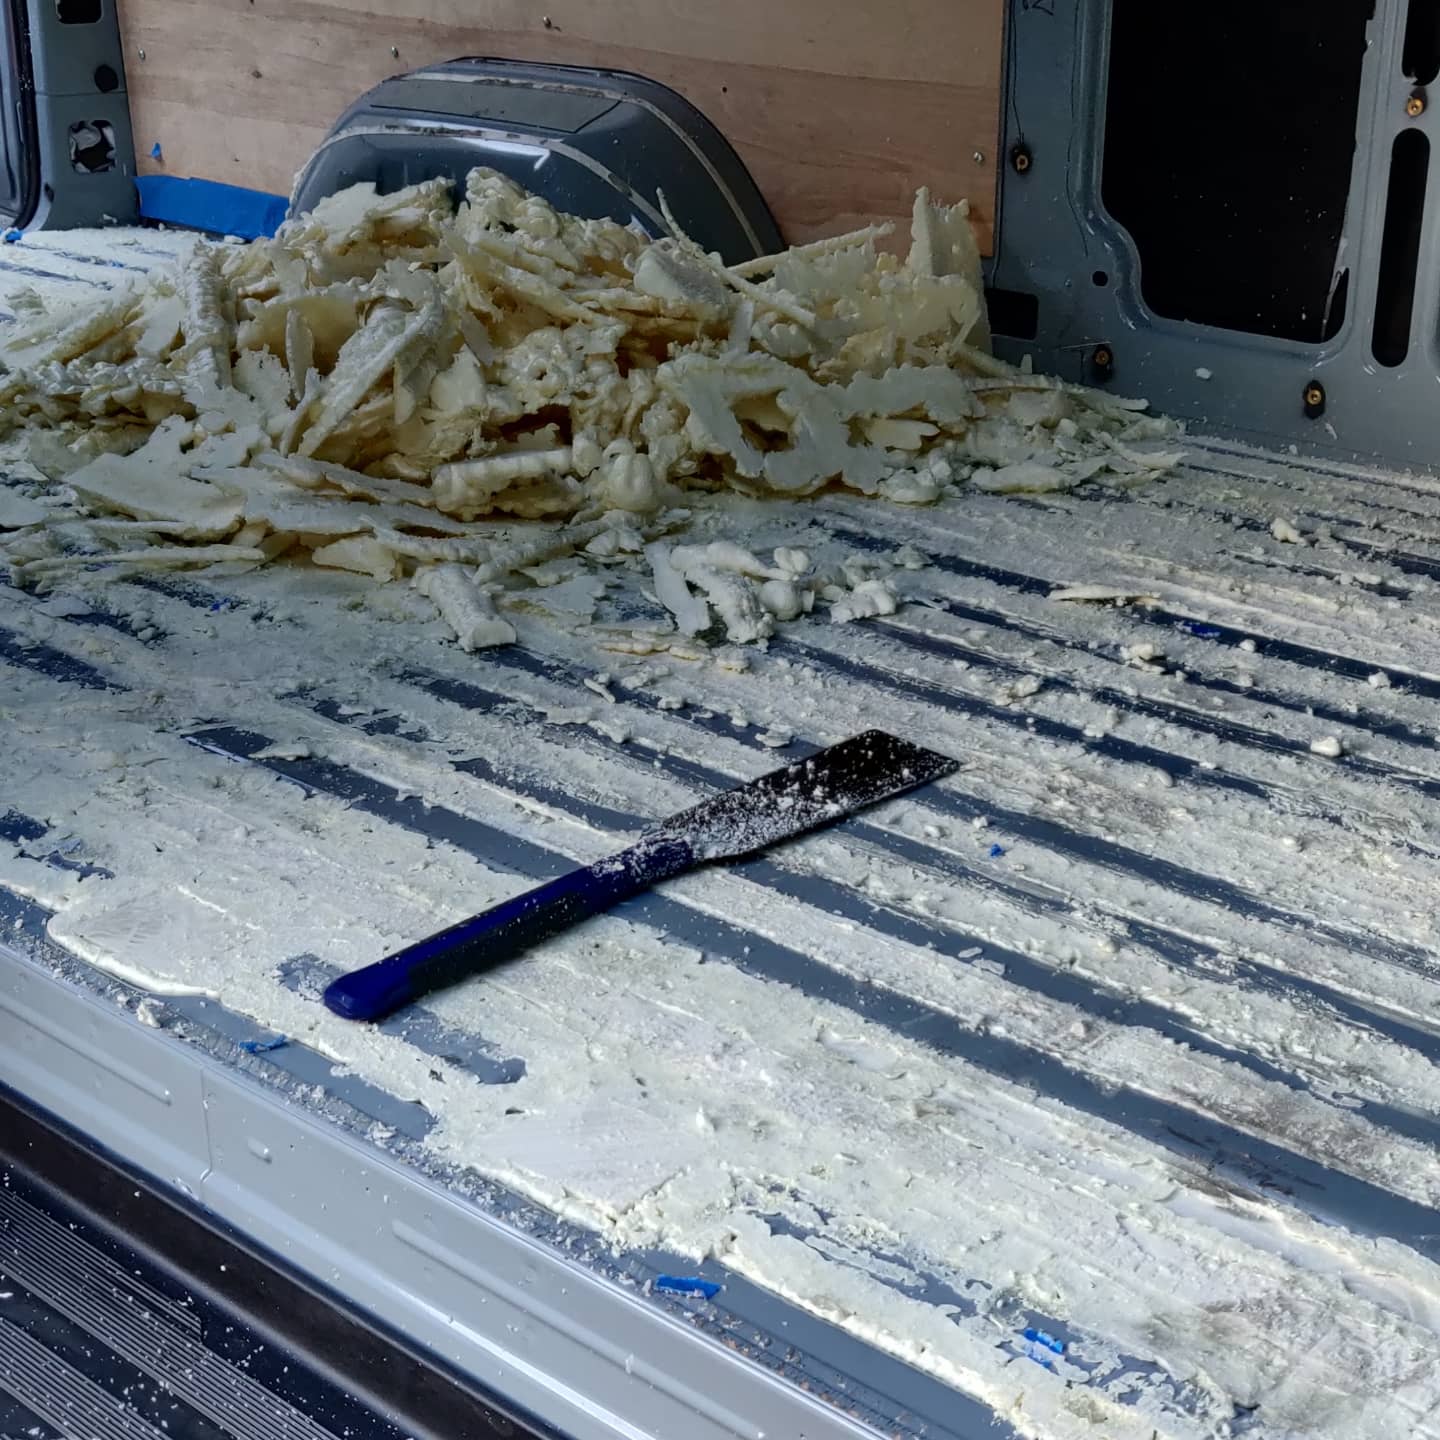
Mistake #1: Spray foam in the corrugations
I tried to “level” the metal with canned spray foam (YouTube made it look easy). It wasn’t.
- Cost: 3 cans at $10 + $20 saw + spare utility blades → approximately $60
- Time: approximately 1 hour to fill, approximately 6 hours to trim/clean
- Result: Got everywhere except where I wanted it, with no meaningful structural or thermal gain
What I learned: 0.5″ rigid foam board sits fine on the corrugation peaks and bridges gaps on its own. The spray foam added mess, cost, and time. However, there is some value: filling the corrugation voids prevents condensation in those spaces. Whether this actually matters remains to be seen—I’ll only know in years’ time. For most builds, the rigid foam board approach is sufficient. You can also use sound deadening material here, which will make the floor even more soundproof.
Mistake #2: Don’t skip the subfloor (I almost did)
The math says rigid foam has decent compressive strength. Reality says your floor will creep and dent under seats, cabinets, and daily use.
Here’s the correct layering order from bottom to top:
- Fill corrugations - Level the metal floor corrugations (optional; rigid foam board can sit on peaks without filling)
- Insulation + furring strips - Insulation with furring strips (wood strips arranged in a grid) at the same level. The furring strips prevent the insulation from being crushed and support the plywood above. This provides your R-value and bridges the corrugations.
- Rigid XPS foam: 1″–1.5″ thickness (more rigid, so can be thinner than wool)
- Wool batts: approximately 2″ thickness (softer, needs more thickness to maintain structure)
- Plywood sheet - 1/2″–3/4″ plywood that spreads loads, gives solid mounting for seating/L-track, and makes the floor feel right
- Finish flooring - Lonseal Lonpoint or 2Tec2 are recommended, but other options are possible (vinyl/woven, etc.)
Furring strips and seating/L‑track: If you may add seats or L‑track later, build a solid furring‑strip grid now and plan backing plates/through‑bolts. Ready‑made floors compatible with seats are fine too. This isn’t a separate decision—it's why furring strips are non‑negotiable.
I used the plywood that was already in my van. This was high-quality plywood on par with good birch plywood—way above the quality you get at Home Depot. Likely 1/2 inch thick, so it was free for me. Keep in mind that while my van was new, I didn’t have configuration options during COVID and probably paid for some unnecessary features.
Verdict: The $45 and a bit of weight for the plywood layer are absolutely worth it. It spreads loads, gives solid mounting for seating/L-track, and makes the floor feel right. Either use the plywood your van comes with or go with a pre-cut option. Cutting this yourself will be very difficult—measuring perfectly won’t be easy, and installation is already challenging enough.
Mistake #3: Undersized wire channels
I cut a channel approximately 1″ wide through the foam for cables. That was optimistic.
- Marine-grade cable is thick and doesn’t like tight bends.
- When I ran 12V lines, solar, and “future” circuits, they barely fit.
- I ended up cutting out sections and re-routing after the subfloor—slow, awkward, and riskier for the cables.
Fix: Plan your wiring before you glue anything. Cut 2–3″ channels with smooth bends, route pull strings, and leave capacity for future circuits.
The Four Decisions That Can’t Be Changed Later
Looking back, there are four critical decisions you must make before you install your floor. Get these wrong, and you’ll either live with regret or tear everything out and start over.
Decision 1: Hydronic Floor Heating—Yes or No?
Important: This decision is only about hydronic floor heating (a system that circulates heated water through tubing under the floor for radiant warmth), not heating in general. You can absolutely have other heating systems (diesel heaters, propane, electric) without floor heating.
Hydronic floor heating must be decided now during the floor build—it can’t be added later. This doesn’t mean you won’t have heating, just that you won’t have radiant floor heating specifically.
Hydronic cost snapshot: Expect total system costs around $9k–$13k depending on components and plumbing — roughly $9k for a setup centered on the Columbia RV Hydronic System plus Rixen’s Floor Heat Kit, up to $13k when pairing Columbia with Van Life Tech’s Siesta package.
Should you choose hydronic?
- Good fit if: You spend 1+ month/year in cold climates or do frequent winter trips, you’re okay budgeting $9k–$13k and some weight/space, and you want warm, evenly heated floors (best ROI on 170” vans).
- Skip if: You’re a 144” weekender or cost/weight/time constrained—throws and a diesel/air heater will suffice; 12V comfort mats can take the edge off.
- Decide now: Hydronic must be integrated during the floor build; you can’t add it later without major rework.
- DIY complexity: Full DIY typically requires routing channels and careful safety practices; pre-cut systems reduce risk and effort.

Columbia RV Hydronic
Subfloor system w/ hydronic tubing and plates.

Rixen's Floor Heat Kit
Conduction floor loop kit; integrates with hydronic.

VLT Siesta
Air heat + on‑demand hot water; integrates into loop.

VLT JustFloors
Structural insulated floor with hydronic heating.
We’ll likely cover hydronic system design and tradeoffs in a separate post.
Decision 2: Recessed Shower Pan—Yes or No?
A recessed shower pan sits flush with the floor, creating a seamless shower area. It looks professional and works great. But it requires cutting into your floor structure and planning drainage during the floor build.
I skipped it. For weekend use, a mobile shower pan works fine. But if you’re building for full-time living and want a permanent shower, plan for the recessed pan now. Obviously you’ll also skip the shower pan if you’re using a full wet bath such as the Van Wife Components Enclosed Shower ($2,399–$2,999). Note: Full wet baths are only recommended for Sprinter 170 builds due to space constraints.
Important consideration: If you’re planning a recessed shower pan but not radiant heating, you’ll likely need custom floor modifications. At that point, you have two paths: go fully custom DIY (with all the router work that entails), or consider a pre-cut kit like the Van Mart Flooring Kit and modify it for your shower pan. However, once you need to heavily modify a kit, some of its value is lost—you’re paying for precision CNC work only to cut it up anyway. Consider whether full DIY might be more cost-effective in that scenario.
Why low profile matters: Vans have very limited usable floor thickness once you account for insulation, subfloor, and finish flooring. If you aren’t building a full wet bath, a low-profile recessed pan preserves headroom and keeps transitions flush. Two solid options to compare side-by-side:
| Option | Price | Why it fits vans | Link |
|---|---|---|---|
| Modern Times Recessed Stainless Steel Shower Pan (32” x 22” x 1” deep) | $650 | 1” recessed depth with 1/2” lip; drops into subfloor cleanly | Vanlife Outfitters |
| Ultra Low Profile Recessed Shower Pan | $495–$535 | Ultra-low profile design suited to limited floor thickness builds | Campervan HQ |
Either will work; choose based on your layout and drain placement preferences. Low profile is the key requirement when the available floor stack is tight.
Portable alternative for non-full-time van lifers:
If you don’t live in your van full-time or mostly travel in summer, a portable shower solution is often better than a permanent recessed pan. Here’s why:

CampClean Shower Kit
$450
Portable solution. Works inside or outside. No floor modifications required. Better for weekenders and summer travelers.

Recessed Shower Pan
$500–$650 + installation + curtain ($200)
Flush with floor, professional look. Requires cutting into floor structure and planning drainage during floor build.

Van Wife Components Enclosed Shower
$2,399–$2,999
Full wet bath enclosure with powder-coated aluminum shower stall and color-matched pan. Available in 24", 30", 33", or 36" widths. Includes pre-drilled holes and rivets for assembly. Plumbing fixtures and shower curtain not included. Note: Full wet baths are only recommended for Sprinter 170 builds due to space constraints.
CampClean Shower Kit - $450 (vs. $700+ for pan + curtain + installation)
Why it’s better for weekenders and summer travelers:
- $450 vs. $700+: Recessed pan ($500–$650) + shower curtain ($200) + manual waterproofing work adds up quickly
- No floor modifications: No cutting into your floor structure or complex waterproofing at the bottom
- Works inside or outside: Set it up wherever you need privacy—inside the van or outside
- Simple draining: After showering, open the door and pour out the water (use biodegradable products)
- Easy storage: Packs down compactly when not in use
I’ve successfully used this shower inside my van, and it’s awesome. The setup is quick, and draining is dead simple—just open the door and tip it out. No permanent plumbing, no waterproofing challenges, and no floor modifications required.
Bottom line: For full-time van life or cold-weather builds, a recessed pan makes sense. For weekenders and summer travelers, the portable solution is more practical and cost-effective.
Decision 3: Wire Routing Strategy
You have two main options:
- Through the floor - Shorter wire runs, easier to install, but requires planning large channels
- Through the roof - Longer wire runs, more complex, but keeps the floor simple
I went with through-the-floor routing, which is why my wire channel mistakes were so costly. If I’d planned for 1-inch channels from the start, I would have saved two hours of rework.
Decision Flowchart: Critical Floor Decisions
These decisions determine your floor build path. Each affects your options and what you can change later:
flowchart TD
    Start([Start: Floor Planning]) --> Decision1{" Hydronic Floor\nHeating? "}

    Decision1 -->|" YES "| Decision2{" Recessed Shower\nPan? "}
    Decision1 -->|" NO "| Decision3{" 12V Underfloor\nHeating?\n(Optional) "}

    Decision2 -->|" YES "| Outcome1["  Outcome: Fully Custom\nHydronic + Recessed Shower\nRequires custom floor modifications\napproximately $9.8k–$14.0k total  "]
    Decision2 -->|" NO "| Outcome2["  Outcome: Hydronic Flooring Kit\nVan Life Tech JustFloors,\nor Columbia RV\napproximately $9.0k–$13.0k total  "]

    Decision3 -->|" YES "| Decision4{" Recessed Shower\nPan? "}
    Decision3 -->|" NO "| Decision4

    Decision4 -->|" YES "| Outcome3["  Outcome: Partially Custom\nRecessed shower pan requires\ncustom floor modifications\napproximately $2.1k–$2.9k total  "]
    Decision4 -->|" NO "| Decision5{" Van has existing\nplywood subfloor? "}

    Decision5 -->|" YES "| Outcome4["  Outcome: Kit 2\nCampervan HQ Pre-Cut\nFloor Kit\napproximately $1.8k–$3.4k total\n+ DIY insulation  "]
    Decision5 -->|" NO "| Outcome5["  Outcome: Kit 1\nVan Mart Insulation System\n+ Campervan HQ Pre-Cut Floor\napproximately $2.8k–$4.0k total\nComplete system  "]

    style Start fill:#7B9ACC,color:#fff,stroke:#5A7AA3,stroke-width:2px
    style Decision1 fill:#C4A57B,color:#000,stroke:#A6855F,stroke-width:2px
    style Decision2 fill:#C4A57B,color:#000,stroke:#A6855F,stroke-width:2px
    style Decision3 fill:#B5C5D4,color:#000,stroke:#9AA8B8,stroke-width:2px
    style Decision4 fill:#C4A57B,color:#000,stroke:#A6855F,stroke-width:2px
    style Decision5 fill:#C4A57B,color:#000,stroke:#A6855F,stroke-width:2px
    style Outcome1 fill:#D4A5A5,color:#000,stroke:#B88A8A,stroke-width:3px
    style Outcome2 fill:#A8C5A0,color:#000,stroke:#8BA682,stroke-width:3px
    style Outcome3 fill:#F4A460,color:#000,stroke:#D2691E,stroke-width:3px
    style Outcome4 fill:#A8C5A0,color:#000,stroke:#8BA682,stroke-width:3px
    style Outcome5 fill:#A8C5A0,color:#000,stroke:#8BA682,stroke-width:3px
Key outcomes:
- Fully Custom: Required for hydronic heating + recessed shower pan combination, OR recessed shower pan without hydronic. Requires advanced router skills or professional installation.
- Hydronic Flooring Kit: Van Life Tech JustFloors or Columbia RV Hydronic System. Used when you want hydronic heating but no recessed shower pan.
- Kit 1: Van Mart complete system (insulation + subfloor + finish flooring) - best for vans without existing plywood subfloor.
- Kit 2: Campervan HQ Pre-Cut Floor Kit only - best for vans with existing plywood subfloor.
- Partial Custom: All kit paths (Kit 1, Kit 2, Hydronic Flooring Kit) still require custom work: furring strips, wire channel planning, and proper installation order.
Important: Always build with furring strips—this is not a decision point. They provide proper floor structure and future seating/L‑track support. 12V underfloor heating is compatible with all non-hydronic options and doesn’t affect the decision flow.
Estimated total costs by outcome (incl. optional 12V)
Assumptions: Uses my DIY base costs (insulation/adhesive/plywood ≈ $290) + typical finish flooring (approximately $970) where applicable; optional 12V comfort heat assumed at $0–$500; excludes labor, tax, and shipping.
| Outcome | What’s included | Estimated total |
|---|---|---|
| DIY (what I did) | DIY base + finish; no hydronic, no recessed; optional 12V | approximately $1.5k–$1.9k (my build was approximately $1.6k) |
| Kit 2 (Existing plywood subfloor) | DIY insulation ($300–$400) + pre‑cut finish ($1.5k–$2.5k) + optional 12V | approximately $1.8k–$3.4k |
| Partially Custom (Recessed, no hydronic) | DIY base + finish + recessed pan + curtain + custom materials + optional 12V | approximately $2.1k–$2.9k |
| Kit 1 (No plywood subfloor) | Van Mart insulation/subfloor + pre‑cut finish + optional 12V | approximately $2.8k–$4.0k |
| Hydronic Flooring Kit (no pan) | Hydronic system only (e.g., Columbia/VLT) | approximately $9.0k–$13.0k |
| Fully Custom (Hydronic + Recessed) | Hydronic system + recessed shower pan + curtain + custom materials | approximately $9.8k–$14.0k |
Notes: Ranges reflect parts only and typical accessory materials; labor and install complexity vary widely. 12V comfort heat is optional and for short‑duration comfort, not primary heating. My build totaled approximately $1,600 (≈$1,500 without the spray‑foam mistake; includes approximately $250 12V mat + approximately $50 cables).
What I Actually Paid (My Complete Floor Build)
Total cost: $1,600 | Direct work time: 14 hours (with 2 people) | Realistic time with overhead: 21 hours
| Category | Items | Total |
|---|---|---|
| Base Layer | Foam board (3 sheets), spray foam (3 cans), tools, construction adhesive, plywood subfloor | $290 |
| Finish Flooring | Lonseal Lonpoint (10 ft), 2Tec2 Stripes (7 ft), epoxy adhesive, trowel | $970 |
| Comfort Heating | 12V heating mat (approximately $250) + medium‑gauge cables (approximately $50) | $300 |
Breaking it down: Base layer (8 hours) + finish flooring (6 hours) = 14 hours direct work. With makerspace overhead (travel, setup, storage), realistic time was 21 hours. What I should have budgeted: 25-30 hours (double estimate + overhead).
The spray foam mistake: Cost me $100 extra and 5 wasted hours. Without it: $1,500 and 9 hours direct work (14-18 hours with overhead).
About the Finish Flooring Choices
I used two different flooring products for different areas of the van:

Lonseal Lonpoint
$33.33/ft
Commercial-grade vinyl flooring, waterproof, 72-inch wide rolls. Budget-friendly option.

2Tec2 High Tech Flooring
$74.40/ft
Woven vinyl, extremely durable, textured modern look. Premium quality.
Lonseal Lonpoint is a commercial-grade vinyl flooring that’s popular in marine and RV applications. It’s waterproof, durable, and comes in 72-inch wide rolls, which minimizes seams in a van. At $33.33 per linear foot, it’s the more budget-friendly option compared to 2Tec2, but it’s still a high-quality commercial-grade product.
2Tec2 High Tech Flooring is a woven vinyl that’s extremely durable and has a more textured, modern look. At $74.40 per linear foot, it’s significantly more expensive, but I used it in the middle section of the van. The quality difference is immediately noticeable—2Tec2 has a premium feel and modern aesthetic that elevates the build.
Choosing between Lonseal and 2Tec2:
- Lonseal is perfectly fine for garage layout builds (bed over gear garage in the back)—it’s a high-quality commercial-grade product that’s durable and more budget-friendly than 2Tec2
- For beach/lifestyle layouts, stay consistent—choose one style and use it throughout for a cohesive look
- If using a pre-cut option, save your time and go with 2Tec2 in a single style—the pre-cut kit eliminates cutting work, making the premium price more reasonable, and you avoid the hassle of coordinating multiple flooring styles
Both require the same installation process: the Lonseal #650 two-part epoxy adhesive applied with a specific U-notch trowel (1/16” x 1/32” x 1/32” spacing). One gallon was more than enough for my Sprinter floor.

Lonseal #650 Two-Part Epoxy Adhesive
Designed for temperature extremes and wet environments. One gallon covers approximately 170-225 sq ft.
The Cutting Challenge (Don’t Underestimate This)
Here’s something I wish someone had told me: cutting and fitting finish flooring is incredibly time-consuming and frustrating. You’re working around wheel wells, ribs, and irregular shapes. Every cut needs to be precise, and mistakes are expensive.
I spent hours with a utility knife, making templates, test-fitting, trimming, and re-trimming. The flooring material is tough (which is good for durability, bad for cutting). My hands were sore for days. Cutting and fitting is the most time-consuming part of the floor build—if you’re comfortable with that level of detail work, DIY can save significant money. If not, a pre-cut kit is worth every dollar.
Order of Operations Matters (Learn From My Mistake)
This is critical: install your finish flooring BEFORE you install cabinets, electrical, or anything else that gets bolted to the floor.
I made a major mistake here: I installed the plywood subfloor, painted it, and used it without finish flooring for a long time. Then I installed cabinets and electrical on top. When I finally wanted to add the finish flooring, I couldn’t remove everything—it was all interconnected. This forced me to either live with an unfinished floor or tear out installed systems, which would have tripled my work.
The correct order:
- Complete the entire floor (corrugation filling → insulation + furring strips → plywood sheet → finish flooring)
- Then install cabinets, electrical, and other systems that mount to the floor
The lesson: Order of operations matters immensely. Once cabinets and electrical are installed, you’ve lost your chance to properly finish the floor. Do it right the first time, in the right order.
Time and Workspace: The Real Requirements for DIY
Here’s what nobody tells you about full DIY builds: you need way more time than you think, and a good workspace matters enormously.
Time Requirements
- Double your time estimate—at minimum. If you think it’ll take 9 hours, budget 18+ hours.
- Allow for mistakes. You will make them. Budget extra time to fix them properly.
- You cannot have a trip planned. Rushing leads to cutting corners, which leads to pulling out installed cabinets later and tripling your work.
The harsh reality: To build everything yourself properly, you need to commit to the full build process without deadline pressure. Otherwise, you’ll make mistakes or cut corners that force you to tear things out and redo them.
Workspace Matters (A Lot)
I built my floor at a makerspace. Here’s what that cost me:
- Lack of coverage: Working outside or in an exposed area added weather delays and constraints
- Storage issues: Moving tools and materials back and forth took significant time
- Travel overhead: Getting to and from the workspace added 50% overhead to every session
The impact: If you think a task takes 9 hours, add another 4-5 hours for workspace overhead. The makerspace added roughly 50% more time to everything I did.
What you actually need:
- A covered workspace (garage, warehouse, covered outdoor space)
- Secure storage for tools and materials
- Easy access (ideally at home or very close)
- Enough space to work comfortably
If you don’t have this, factor in 50%+ time overhead. The “convenience tax” of a poor workspace is real and substantial.
Complete Floor System Recommendations (Updated)
After researching the full range of products available, here’s my comprehensive guide to choosing the right combination for your build. The decision largely depends on whether your van comes with a plywood subfloor and whether you want hydronic heating.
Premium Option: Hydronic Heating Systems ($3,500-4,500+)
If you want radiant floor heating, decide now—it can’t be added later. Options: Van Life Tech JustFloors ($4,300+) or Columbia RV Hydronic System ($3,500-4,500+).
Van Life Tech JustFloors
$4,300+
Premium structural insulated floor with integrated hydronic heating. No router work required.
Columbia RV Hydronic System
$3,500-4,500+
Complete subfloor system with integrated hydronic tubing, transfer plates, and plywood.
Mid-Range Options: Non-Heated Floor Systems
The best option depends on whether your van already has a plywood subfloor installed from the factory.
Option A: Van Already Has Plywood Subfloor
DIY insulation (rigid foam board or wool batts) + Campervan HQ Pre-Cut 2Tec2/Lonseal Floor Kit - $300-400 insulation + $1,500-2,500 finish.

Campervan HQ Pre-Cut Floor Kit
Pre-cut finish flooring saves 4-6 hours. Same price for 2Tec2 or Lonseal—makes 2Tec2 better value if going pre-cut.
Option B: Van Doesn’t Have Plywood Subfloor (Most Common)
Top recommendation: The Van Mart Sprinter Floor Insulation System and Subfloor + Campervan HQ Pre-Cut 2Tec2/Lonseal Floor Kit - $2,800-3,500. Complete system: insulation + subfloor + finish flooring all pre-cut. Saves 8-10 hours vs. DIY.
Alternative: RackUp+Go Sprinter Van CNC Wood Floor Kit ($725) + DIY insulation + Pre-cut finish flooring - $2,500-3,600. More budget-friendly, you control insulation type.
Budget option: RB Components TPO Coin Flooring - $403 for 144” Sprinter (pre-cut to length only, still requires trimming). Chemical-resistant and durable.

Van Mart Insulation System
Complete system: insulation + subfloor + finish flooring all pre-cut. Saves 8-10 hours vs. DIY.
Campervan HQ Pre-Cut Floor Kit
Pre-cut finish flooring saves 4-6 hours. Same price for 2Tec2 or Lonseal.

RackUp+Go Plywood Kit
$725
More budget-friendly, you control insulation type.

RB Components TPO
$403 (144" Sprinter)
Pre-cut to length only, still requires trimming. Chemical-resistant and durable.
What I’d do next time (step-by-step)
- Skip spray foam entirely. Dry-fit 1″ rigid foam; confirm bridging.
- Plan wire routing first. Cut 2–3″ channels; add pull strings and gentle bends.
- Glue foam sparingly. Favor serviceability along wire runs.
- Install 1/2″ plywood subfloor. Scribe, bond, fasten; seal edges/penetrations.
- Install finish flooring NOW—before anything else. Complete the entire floor system before installing cabinets or electrical. This is critical—order of operations matters.
- Decide on floor heating now. If you want hydronic floor heating ($3,500-4,500+), it must be installed during the floor build. For 12V underfloor heating ($279-558), you also need to decide now if you want it installed—it requires a medium-to-large battery and has limitations (can’t run overnight without external power). Note: 12V floor heating is for comfort only, not a replacement for your primary heating system. Otherwise, skip floor heating—you can add other heating systems (diesel, propane, etc.) later.
- Lock the seating/L-track plan. Backing plates and through-bolts sorted before finish.
- Only then install cabinets, electrical, and other systems that mount to the floor.
DIY vs. Kit: The Honest Verdict
Overall, the flooring is actually one of the easiest van build components to do from scratch—learn from my small hiccups with cable wiring, and you’ll be fine. The floor being completely flat makes it much simpler than walls, ceiling, or any curved surfaces.
A word on experience: If you would do something to your own home, then please go ahead and consider it for your van. For example, if you’ve installed radiant heating in your home, you’ll probably be able to do it in your van too. But using your van to learn everything for the first time will drain you.
However, if you want to add radiant heating or a recessed shower pan, you’ll face significantly more complexity. Radiant heating especially requires advanced router skills and safety knowledge—if you don’t have excellent router experience, the value of a pre-cut kit with integrated heating is immense. Router work is dangerous and unforgiving.
For shower pans, you’ll need custom modifications that may reduce the value of a pre-cut kit if you heavily modify it—at that point, full DIY might be more cost-effective since you’re already doing custom work.
If You Have to Choose: Floor Kit vs. Ceiling/Wall Kit
If your budget only allows one kit purchase, definitely choose the ceiling or wall kit. Here’s why:
- Floor: The floor is flat—measuring and cutting is mostly straight lines, even with wheel well cutouts
- Ceiling/Walls: Complex curves, precise angles around roof ribs, perfect joins around windows and doors—these are where professional CNC-cutting really shines
The floor is where you can save money by DIY and still get excellent results. The ceiling and walls are where precision matters most, and mistakes are much harder to fix.
Rating Scale: Building a Van Floor
Difficulty: ⭐️⭐️⭐️☆☆ (3/5) without heating/shower pan. With radiant heating: ⭐️⭐️⭐️⭐️⭐️ (5/5) - requires advanced router skills.
Cost: ⭐️⭐️☆☆☆ (2/5) - budget-friendly even with quality materials. DIY: $1,200-1,300. Pre-cut kits: $1,500-3,500+.
Time: ⭐️⭐️⭐️⭐️☆ (4/5) - budget 25-30 hours including workspace overhead. DIY: 9-14 hours direct work. Pre-cut kits: 2-5 hours.
Kit value: ⭐️⭐️⭐️☆☆ (3/5) without heating—saves 4-6 hours and prevents order-of-operations mistakes. With radiant heating: ⭐️⭐️⭐️⭐️⭐️ (5/5) if you lack router skills.
The bottom line
My floor cost $1,600 and took 14 hours direct work (realistically 21 hours with workspace overhead). I should have budgeted 25-30 hours (double estimate + overhead). Skipping the spray foam and planning wire channels up front would have brought it closer to $1,500 and 9 hours direct work (14-18 hours with overhead).
If going DIY:
- Double your time estimate and budget for mistakes
- Secure covered workspace is essential (traveling to a Makerspace or similar add 50%+ overhead)
- Complete the entire floor before cabinets/electrical—order of operations is critical
- No trip planned—rushing leads to costly mistakes
If choosing a kit:
- Pre-cut kits eliminate order-of-operations mistakes and cutting/fitting frustration—the biggest benefit is knowing it will work
- Adding radiant heating? Kit value is immense unless you have excellent router skills (router work is dangerous)
- Adding shower pan? Heavy kit modifications reduce value—consider if full DIY is more cost-effective
- Choosing between kits? Prioritize ceiling/wall kits—save floor for DIY and put budget where precision matters most
Time savers: Prioritize pre-cut finish flooring (hardest part). Campervan HQ Pre-Cut Floor Kit saves 4-6 hours. RackUp+Go Plywood Kit ($725) saves subfloor cutting time. Complete system: Van Mart Insulation + Subfloor + Campervan HQ Pre-Cut Floor eliminates most time-consuming work.
Product Reference Guide
All products mentioned in this guide, with prices and links:
Van Life Tech JustFloors
$4,300+
Columbia RV Hydronic System
$3,500-4,500+

EX-UP Underfloor Heating 12V
$279-558
Van Mart Insulation System
$2,800-3,500
Campervan HQ Pre-Cut Floor Kit
$1,500-2,500
Lonseal Lonpoint
$33.33/ft
2Tec2 High Tech Flooring
$74.40/ft
Lonseal #650 Epoxy Adhesive
Price varies

Ultra Low Profile Shower Pan
$495-535

Van Mart Flooring Kit
Price varies
Comments
Comments